

Document Actions
Printing in the Grad Lab (CS Room 300)
Unix
This section contains Linux/Unix instructions for setting up printing to anic (or joffrey), the Postgraduate Laboratory printers, via the new accounting print service.
Guide to configure printing from Windows below.
These instructions have been tested using the Lucid (10.04) version of the Ubuntu linux distribution. They should work for other versions of Ubuntu without much change. They should also work for other distributions of linux or unix (such as MacOS X) which use of the CUPS printing system, though the configuration utilities may differ and you may need to do your own detective work to figure out where to enter the configuration options in the instructions below.
If you have trouble following these instructions, send a request for assistance to help@cs.uct.ac.za and include information about the distribution and version of linux or unix you are using.
Requirements
Before being able to print you will need to meet the following requirements.
- You must have sudo/root privileges on your workstation to be able to install and configure a new printer.
- You will need a CS unix account to be able to authenticate to print once this configuration is complete.
Contact help@cs.uct.ac.za if you do not meet these requirements.
Instructions
These instructions have been written for Ubuntu.
Log into the graphical user interface (GUI) as a user with sudo privileges.
Click System > Administration > Printing. The "Printing - localhost" window should appear. If you are asked for a password, enter your workstation password.
Click "Add" to add a new printer. The "New Printer" dialog should appear.
Click Network Printer > Internet Printing Protocol (ipp) and enter the following into the fields provided:
Host: ps1.cs.uct.ac.za
Queue: /printers/anic
Once you have completed the above fields, the full printer "URI" should be displayed as ipp://ps1.cs.uct.ac.za/printers/anic
Click the Verify button to test this configuration. If you entered the above information correctly, you should see a Print Share Verified dialog box. Click the OK button to continue.
Click the "Forward" button to continue to the next step of the the printer configuration.
A "Searching for drivers" dialog should appear. Please wait while the system collects information about available print servers on your system. This may take a few minutes. The dialog should eventually disappear.
The "Choose Driver" dialog should appear. Click "Select printer from database" and select "HP" from the list of printer Makes provides. Click the "Forward" button to continue with the next stage of the printer configuration.
A list of printer Models will be displayed. Search for and select "LaserJet P3005" from the list on the left. Make sure that "HP LaserJet P3005 Postscript [en] (recommended)" is selected from the list of drivers on the right when this option is selected. Click the "Forward" button to continue with the printer configuration.
The "Installable Options" dialog will appear. Make sure that you set the available options as follows to ensure that you are able to make use of the features of this printer:
- Change "Tray 3" from "Not Installed" to "Installed"
- Leave "Collation in Printer" as "No: Total RAM < 80MB and No Hard Disk"
- Leave "Printer Disk" as "No Installed"
- Make sure that the Duplex Unix option is selected.
- Leave "Fit to Page" as "Prompt User"
Click the "Forward "button to continue with the configuration.
8. The "Describe Printer" dialog will appear. Fill in the field provided as below:
- Change "Printer Name" to "anic-via-ps1"
- Change "Description" to "HP LaserJet p3005x"
- Change "Location" to "CS300"
Click the "Apply" button to complete the printer configuration.
If prompted to print a test page, click the No button.
Your computer should now be configured to print to the Room 300 printer, anic, via new print account system.
Printing
To print from most GUI applications, click the applications Print option and select the printer you defined above ("anic-via-ps1") from the list of available printers. The printer should prompt you for a username and password
to authenticate your print job. Enter your CS unix username and password. If authentication succeeds, your print job should automatically be forwarded for your local print service to the print service on the PS1 print server where it will be counted before being sent to the printer to be printed.
To print from the command-line using the lpr command as usual e.g.
lpr -Panic-via-ps1 file.ps
The print job will be placed in the print queue on your workstation, and held until you authenticate it. To authenticate it, click System > Administration > Printing. The Printing window listing all of the available printers will be displayed. Right click on the the printer "anic-via-ps1" and select "View print queue" from the menu. A list of print jobs will appear. Right click on the print job and select Authenticate from the menu to authenticate and print the print job.
If the print server is unable to print the print job - for example, if you are not authorised to print to the printer - it will send an email to your CS email address. Be sure to check this email address for messages from the
printer if you find that your print jobs are being successfully sent from your machine to the printer server but are not being printed.
Windows
Guide to setting up printing to printers anic and/or joffrey in the Postgraduate Laboratories.
Please email the Computer Science Helpdesk help@cs.uct.ac.za if assistance is required.
Requirements
- administrative privileges on the local workstation is required in order to install and configure a new printer.
- Computer Science Windows credentials are required to authenticate to the printing system.
Instructions
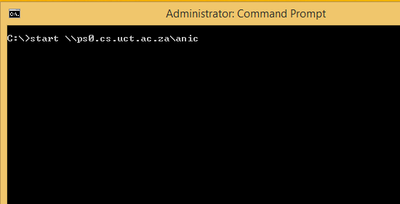
Open a Command Prompt window, eg. Window Key + R > then type CMD in the Open dialog field.
In the Command Prompt window, type "start \\ps0.cs.uct.ac.za\<printer name>", eg. start \\ps0.cs.uct.ac.za\anic
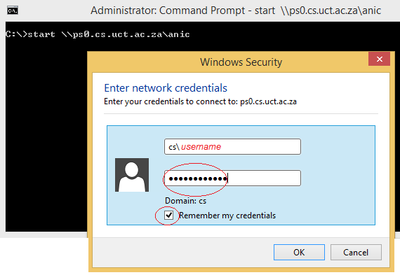
Type in your Microsoft Windows credentials in the ensuing authentication dialog, eg. cs\<username> and password
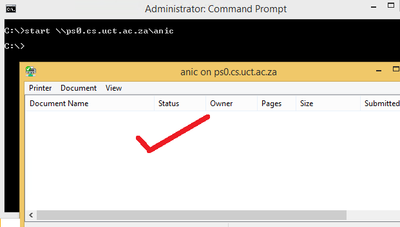
The installation will proceed with the automatic installation of the printer driver and the presentation of the connected printer
Printing
Open any document, click on Print
Select the printer from the drop-down list, eg. anic
Print jobs will be submitted with the preset printer defaults, viz. duplex (double sided), economy (saves on toner)